
Introduction
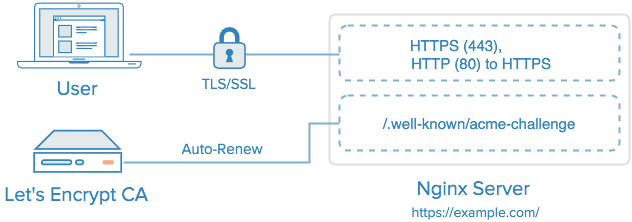
Let's Encrypt is a new Certificate Authority (CA) that provides an easy way to obtain and install free TLS/SSL certificates, thereby enabling encrypted HTTPS on web servers. It simplifies the process by providing a software client,
letsencrypt, that attempts to automate most (if not all) of the required steps. Currently, as Let's Encrypt is still in open beta, the entire process of obtaining and installing a certificate is fully automated only on Apache web servers. However, Let's Encrypt can be used to easily obtain a free SSL certificate, which can be installed manually, regardless of your choice of web server software.
In this tutorial, we will show you how to use Let's Encrypt to obtain a free SSL certificate and use it with Nginx on CentOS 7. We will also show you how to automatically renew your SSL certificate. If you're running a different web server, simply follow your web server's documentation to learn how to use the certificate with your setup.
Prerequisites
Before following this tutorial, you'll need a few things.
You should have an CentOS 7 server with a non-root user who has
sudo privileges.
You must own or control the registered domain name that you wish to use the certificate with. If you do not already have a registered domain name, you may register one with one of the many domain name registrars out there (e.g. Namecheap, GoDaddy, etc.).
If you haven't already, be sure to create an A Record that points your domain to the public IP address of your server. This is required because of how Let's Encrypt validates that you own the domain it is issuing a certificate for. For example, if you want to obtain a certificate for
example.com, that domain must resolve to your server for the validation process to work. Our setup will use example.com and www.example.comas the domain names, so both DNS records are required.
Once you have all of the prerequisites out of the way, let's move on to installing the Let's Encrypt client software.
Step 1 — Install Let's Encrypt Client
The first step to using Let's Encrypt to obtain an SSL certificate is to install the
letsencrypt software on your server. Currently, the best way to install Let's Encrypt is to simply clone it from the official GitHub repository. In the future, it will likely be available via a package manager.Install Git and Bc
Let's install Git now, so we can clone the Let's Encrypt repository.
Install the
git and bc packages with yum:
- sudo yum install git bc
With
git and bc installed, we can easily download letsencrypt by cloning the repository from GitHub.Clone Let's Encrypt
We can now clone the Let’s Encrypt repository in
/opt with this command:
- sudo git clone https://github.com/letsencrypt/letsencrypt /opt/letsencrypt
You should now have a copy of the
letsencrypt repository in the /opt/letsencrypt directory.Step 2 — Obtain a Certificate
Let's Encrypt provides a variety of ways to obtain SSL certificates, through various plugins. Unlike the Apache plugin, which is covered in a different tutorial, most of the plugins will only help you with obtaining a certificate which you must manually configure your web server to use. Plugins that only obtain certificates, and don't install them, are referred to as "authenticators" because they are used to authenticate whether a server should be issued a certificate.
We'll show you how to use the Standalone plugin to obtain an SSL certificate.
Verify Port 80 is Open
The Standalone plugin provides a very simple way to obtain SSL certificates. It works by temporarily running a small web server, on port
80, on your server, to which the Let's Encrypt CA can connect and validate your server's identity before issuing a certificate. As such, this method requires that port 80 is not in use. That is, be sure to stop your normal web server, if it's using port 80 (i.e. http), before attempting to use this plugin.
For example, if you're using Nginx, you can stop it by running this command:
- sudo systemctl stop nginx
If you're not sure if port
80 is in use, you can run this command:netstat -na | grep ':80.*LISTEN'
If there is no output when you run this command, you can use the Standalone plugin.
Run Let's Encrypt
Before using Let's Encrypt, change to the
letsencrypt directory:
- cd /opt/letsencrypt
Now use the Standalone plugin by running this command:
- ./letsencrypt-auto certonly --standalone
Note: The Let's Encrypt software requires superuser privileges, so you will be required to enter your password if you haven't used
sudo recently. Also, the first time you run letsencrypt-auto it may install additional required packages.
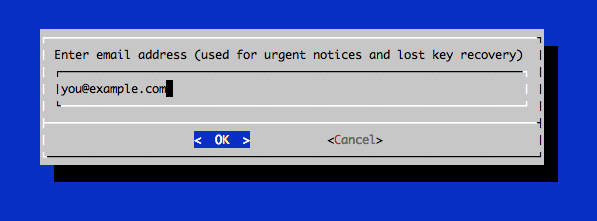
After
letsencrypt initializes, you will be prompted for some information. This exact prompts may vary depending on if you've used Let's Encrypt before, but we'll step you through the first time.
At the prompt, enter an email address that will be used for notices and lost key recovery:
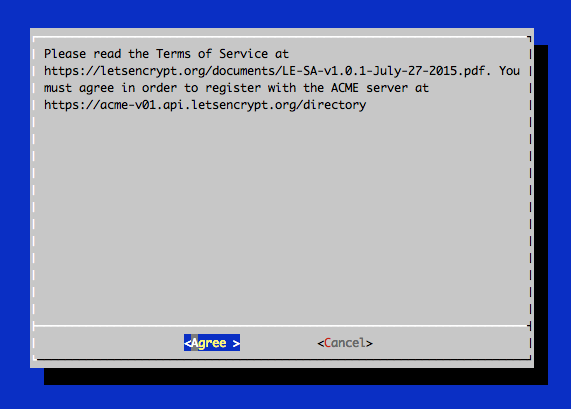
Then you must agree to the Let's Encrypt Subscribe Agreement. Select Agree:
Then enter your domain name(s). Note that if you want a single cert to work with multiple domain names (e.g.
example.com and www.example.com), be sure to include all of them:
If everything was successful, you should see an output message that looks something like this:
Output:
IMPORTANT NOTES:
 - If you lose your account credentials, you can recover through
   e-mails sent to sammy@digitalocean.com
 - Congratulations! Your certificate and chain have been saved at
   /etc/letsencrypt/live/example.com/fullchain.pem. Your
   cert will expire on 2016-03-15. To obtain a new version of the
   certificate in the future, simply run Let's Encrypt again.
 - Your account credentials have been saved in your Let's Encrypt
   configuration directory at /etc/letsencrypt. You should make a
   secure backup of this folder now. This configuration directory will
   also contain certificates and private keys obtained by Let's
   Encrypt so making regular backups of this folder is ideal.
 - If like Let's Encrypt, please consider supporting our work by:

   Donating to ISRG / Let's Encrypt:   https://letsencrypt.org/donate
   Donating to EFF:                    https://eff.org/donate-le
You will want to note the path and expiration date of your certificate, which was highlighted in the example output.
Note: If your domain is routing through a DNS service like CloudFlare, you will need to temporarily disable it until you have obtained the certificate.
Certificate Files
After obtaining the cert, you will have the following PEM-encoded files:
- cert.pem: Your domain's certificate
- chain.pem: The Let's Encrypt chain certificate
- fullchain.pem:
cert.pemandchain.pemcombined - privkey.pem: Your certificate's private key
It's important that you are aware of the location of the certificate files that were just created, so you can use them in your web server configuration. The files themselves are placed in a subdirectory in
/etc/letsencrypt/archive. However, Let's Encrypt creates symbolic links to the most recent certificate files in the /etc/letsencrypt/live/your_domain_name directory. Because the links will always point to the most recent certificate files, this is the path that you should use to refer to your certificate files.
You can check that the files exist by running this command (substituting in your domain name):
- sudo ls /etc/letsencrypt/live/your_domain_name
The output should be the four previously mentioned certificate files. You will most likely configure your web server to use
fullchain.pem as the certificate file, and privkey.pem as the certificate key file.Step 3 — Configure TLS/SSL on Web Server (Nginx)
Now that you have an SSL certificate, you need to configure your web server to use it.
We'll demonstrate how to configure the Nginx web server to use the certificate. If you use different web server software, you will need to reference how to set up SSL certificates with that particular software.
If you haven't installed Nginx yet, first install the
epel-release repository:
- sudo yum install epel-release
Then install Nginx with this command:
- sudo yum install nginx
Now you must edit the Nginx configuration to use the Let's Encrypt certificate files. The default Nginx configuration on CentOS is pretty open-ended but we will create a new server block that uses SSL/TLS and listens on port 443. Then we'll configure the default (HTTP on port 80) server block to redirect to the HTTPS-enabled server block.
By default, additional server block configuration can be placed in
/etc/nginx/conf.d. Create a new file called ssl.conf and open it for editing with this command:
- sudo vi /etc/nginx/conf.d/ssl.conf
Then paste this configuration in. Be sure to change every instance of
example.com, all four, with your own domain name:
/etc/nginx/conf.d/ssl.conf
server {
        listen 443 ssl;

        server_name example.com www.example.com;

        ssl_certificate /etc/letsencrypt/live/example.com/fullchain.pem;
        ssl_certificate_key /etc/letsencrypt/live/example.com/privkey.pem;

        ssl_protocols TLSv1 TLSv1.1 TLSv1.2;
        ssl_prefer_server_ciphers on;
        ssl_ciphers 'EECDH+AESGCM:EDH+AESGCM:AES256+EECDH:AES256+EDH';


        root /usr/share/nginx/html;
        index index.html index.htm;

        # Make site accessible from http://localhost/
        server_name localhost;

        location / {
                # First attempt to serve request as file, then
                # as directory, then fall back to displaying a 404.
                try_files $uri $uri/ =404;
                # Uncomment to enable naxsi on this location
                # include /etc/nginx/naxsi.rules
        }
}
Save and exit. This configures Nginx to use SSL, and tells it to use the Let's Encrypt SSL certificate that we obtained earlier. Note that this example configuration simply serves the default Nginx page, so you may want to modify it to meet your needs.
Next, we'll configure Nginx to redirect HTTP requests on port 80 to HTTPS on port 443.
The default Nginx configuration file allows us to easily add directives to the port 80 server block by adding files in the
/etc/nginx/default.d directory. Create a new file called ssl-redirect.conf and open it for editing with this command:
- sudo vi /etc/nginx/default.d/ssl-redirect.conf
Then paste in this line:
/etc/nginx/default.d/ssl-redirect.conf
return 301 https://$host$request_uri;
Save and exit. This configures the HTTP on port 80 (default) server block to redirect incoming requests to HTTPS.
Now start Nginx:
- sudo systemctl start nginx
You will also want to enable Nginx, so it starts when your server boots:
- sudo systemctl enable nginx
The Let's Encrypt TLS/SSL certificate is now in place. At this point, you should test that the TLS/SSL certificate works by visiting your domain via HTTPS in a web browser.
Step 4 — Set Up Auto Renewal
Let’s Encrypt certificates are valid for 90 days, but it’s recommended that you renew the certificates every 60 days to allow a margin of error. At the time of this writing, automatic renewal is still not available as a feature of the client itself, but you can manually renew your certificates by running the Let’s Encrypt client again.
A practical way to ensure your certificates won’t get outdated is to create a cron job that will automatically handle the renewal process for you. In order to avoid the interactive, menu-driven process that we used earlier, we will use different parameters when calling the Let’s Encrypt client in the cron job.
We will use Webroot plugin, instead of the Standalone plugin used earlier, because it allows your server to validate your domain without stopping your web server. The Webroot plugin adds a hidden file to your web server's document root, which the Let's Encrypt CA can read to verify your domain.
How To Use the Webroot Plugin
The Webroot plugin works by placing a special file in the
./well-known directory within your document root, which can be opened (through your web server) by the Let's Encrypt service for validation. Depending on your configuration, you may need to explicitly allow access to the /.well-known directory. To ensure that the directory is accessible to Let's Encrypt for validation, let's make a quick change to our Nginx configuration. Open ssl.conf for editing:
- sudo vi /etc/nginx/conf.d/ssl.conf
Within the server block, add this location block:
Add to SSL server block
        location ~ /.well-known {
                allow all;
        }
If you changed the path of the
root directive, note it now, as the path is required to use the Webroot plugin. If you're using the example configuration file, the root will be /usr/share/nginx/html.
Save and exit.
Now that we know our
webroot-path, we can use the Webroot plugin to renew our certificate with this commands. Here, we are also specifying our domain names with the -d option. Note that you should replace the highlighted parts with the appropriate webroot path and domain names:
- cd /opt/letsencrypt
- ./letsencrypt-auto certonly -a webroot --agree-tos --renew-by-default --webroot-path=/usr/share/nginx/html -d example.com -d www.example.com
Once that succeeds, you will need to reload your Nginx service to use the renewed certificate:
- sudo systemctl reload nginx
Now that we know the commands that we need to renew our certificate, we can automate this process using scripts and a cron job.
Create a Let's Encrypt Configuration File
Before moving on, let's simplify our renewal process by creating a Let's Encrypt configuration file at
/usr/local/etc/le-renew-webroot.ini.
- sudo cp /opt/letsencrypt/examples/cli.ini /usr/local/etc/le-renew-webroot.ini
Now open the file for editing;
- sudo vi /usr/local/etc/le-renew-webroot.ini
Next, uncomment the
email, domains, and webroot-path lines, and update them with your own information. When you are done, the file (with comments removed) should look something like this:
le-cli-example.com.ini excerpt
rsa-key-size = 4096

email = you@example.com

domains = example.com, www.example.com

webroot-path = /usr/share/nginx/html
Now, instead of specifying the webroot path and domain names in the command, we can use the Let's Encrypt configuration file to fill in the blanks. Assuming your configuration file is correct, this command can be used to renew your certificate:
cd /opt/letsencrypt
./letsencrypt-auto certonly -a webroot --renew-by-default --config /usr/local/etc/le-renew-webroot.ini
Now let's create a script that we can use to renew our certificate.
Create a Renewal Script
To automate the renewal process, we will use a shell script that will verify the certificate expiration date for the provided domain and request a renewal when the expiration is less than 30 days away. This script will be scheduled to run once a week. This way, even if a cron job fails, there’s a 30-day window to try again every week.
First, download the script and make it executable. Feel free to review the contents of the script before downloading it.
- sudo curl -L -o /usr/local/sbin/le-renew-webroot https://gist.githubusercontent.com/thisismitch/e1b603165523df66d5cc/raw/fbffbf358e96110d5566f13677d9bd5f4f65794c/le-renew-webroot
- sudo chmod +x /usr/local/sbin/le-renew-webroot
The
le-renew-webroot script takes as argument the domain name whose certificate you want to check for renewal. When the renewal is not yet necessary, it will simply output how many days are left until the given certificate expiration.
Note: The script will not run if the
/usr/local/etc/le-renew-webroot.ini file does not exist. Also, be sure that the first domain that is specified in the configuration file is the same as the first domain you specified when you originally created the certificate.
If you run the script now, you will be able to see how many days are left for this certificate to expire:
- sudo /usr/local/sbin/le-renew-webroot
output
Checking expiration date for example.com...
The certificate is up to date, no need for renewal (89 days left).
Next, we will edit the crontab to create a new job that will run this command every week. To edit the crontab for the root user, run:
- sudo crontab -e
Include the following content, all in one line:
crontab entry
30 2 * * 1 /usr/local/sbin/le-renew-webroot >> /var/log/le-renewal.log
Save and exit. This will create a new cron job that will execute the
le-renew-webroot command every Monday at 2:30 am. The output produced by the command will be piped to a log file located at/var/log/le-renewal.log.Conclusion
That's it! Nginx is now using a free Let's Encrypt TLS/SSL certificate to securely serve HTTPS content.
No comments :
Post a Comment